
Roof leak detection and repair is an essential skill for homeowners, especially when it comes to safeguarding your living space from potential damage. Leaks can go unnoticed for long periods, leading to extensive repairs and costly renovations. By understanding the techniques for identifying leaks and the various repair methods available, you can ensure your roof remains in optimal condition and your home stays safe and dry.
This guide explores the different techniques for spotting leaks, from visual inspections to advanced technology. Additionally, it lays out straightforward DIY repair options and offers valuable tips for maintaining your roof. Whether you’re looking to tackle repairs yourself or hire a professional, this information will empower you to make informed decisions about your roofing needs.
Roof Leak Detection Techniques
Identifying roof leaks promptly can save homeowners from costly repairs and extensive damage. Various techniques are utilized to detect leaks, ensuring that potential issues are addressed before they escalate. Understanding these methods and knowing how to conduct a thorough inspection is essential for maintaining the integrity of your roof.One effective way to locate roof leaks is through a combination of visual inspections, moisture meters, and infrared thermography.
Each method has its unique strengths and can provide valuable insights into the condition of your roof.
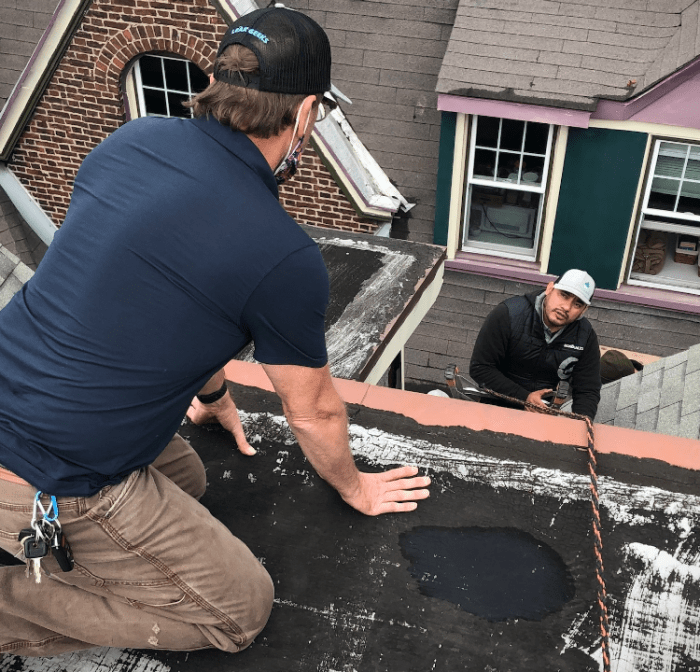
Visual Inspection
Visual inspection is often the first step in detecting roof leaks. It involves closely examining the roof surface for signs of damage or wear. Here’s a detailed process to conduct an effective visual inspection:
1. Prepare the Area
Ensure safety by wearing appropriate gear, such as non-slip shoes and a harness if necessary. Clear any debris from the roof that may obstruct your view.
2. Inspect Roofing Materials
Check for missing, cracked, or curled shingles. Look for any signs of deterioration or damage that may allow water to penetrate.
3. Examine Flashing
Inspect the flashing around chimneys, vents, and other roof penetrations. Ensure that it is securely attached and free from rust or damage.
4. Look for Moss and Algae
The presence of moss or algae can retain moisture on the roof surface, leading to potential leaks.
5. Check Gutters and Downspouts
Ensure that gutters are free from blockages and properly directing water away from the roof structure.
Moisture Meters
Moisture meters are valuable tools for detecting hidden leaks within roofing systems. These devices measure the moisture content in building materials and can help identify areas affected by water intrusion.
Choose the Right Meter
Select either a pin-type or pinless moisture meter based on your needs. Pin-type meters are more accurate for localized spots, while pinless meters can scan larger areas.
Conducting the Test
Press the sensor against the roofing material. High moisture readings indicate potential leaks, especially when compared to adjacent areas.
Interpreting Results
Familiarize yourself with normal moisture levels for your roofing materials to accurately assess the readings.
Infrared Thermography
Infrared thermography is a non-invasive method that uses thermal imaging to detect temperature differences in roofing materials, indicating moisture presence.
Understanding Thermal Patterns
Wet areas retain heat differently than dry areas. The thermal camera reveals these differences, allowing for precise leak location.
Conducting the Scan
Perform the scan under suitable weather conditions, preferably during cooler times of the day when temperature variances are more pronounced.
Analyzing Images
Review the thermal images for anomalies, focusing on areas where temperature differentials suggest moisture intrusion.
Signs of Roof Damage Indicative of Leaks
Recognizing signs of roof damage is crucial for early leak detection. Here are some common indicators to watch for:
Stains on Ceilings or Walls
Water stains often indicate a leak above. Look for discoloration or bubbling paint.
Mold and Mildew
The presence of mold or mildew inside the home can suggest moisture infiltration from the roof.
Peeling Paint or Wallpaper
This can be a sign of excess moisture caused by leaks.
Sagging Roof Deck
A sagging area may indicate accumulated water or structural issues, potentially leading to leaks.
Dripping Water
Obvious dripping from the ceiling during rainfall is a clear sign of a leak.By employing these detection techniques and staying vigilant for signs of damage, homeowners can effectively identify and address roof leaks before they become significant problems.
Roof Leak Repair Methods
Repairing roof leaks can be crucial in maintaining the integrity of your home. Different roofing materials require specific repair methods to ensure long-lasting solutions. Understanding these methods can help homeowners alleviate issues and safeguard their property from further damage.
Repair Methods for Various Roofing Materials
Each type of roofing material has its own set of challenges when it comes to leak repairs. Here’s a breakdown of common roofing materials and appropriate repair techniques:
- Shingle Roofs: For asphalt shingles, repairs often involve replacing damaged or missing shingles. This is done by carefully lifting the surrounding shingles, removing the damaged piece, and nailing down a new shingle. Ensure to use roofing cement to seal the edges for added protection.
- Metal Roofs: Metal roofs may develop leaks due to rust or loose fasteners. Tightening screws and applying a sealant can help. In cases of extensive damage, metal patches are applied over the affected areas after cleaning and drying them thoroughly.
- Flat Roofs: Flat roofs often require different strategies, such as applying a patch of roofing membrane or using a liquid sealant. Depending on the extent of the leak, applying a new layer of roofing felt and sealing it with a waterproof membrane may also be necessary.
DIY Roof Leak Repair Guide
Tackling a roof leak yourself can save money and time. Here’s a guide to help you perform basic repairs on your own.
- Tools Needed: A ladder, utility knife, roofing cement, caulking gun, replacement shingles or membrane, and safety gear (gloves and goggles).
- Materials Required: Shingles or roofing membrane, roofing nails, waterproof sealant, and tar paper for flat roofs.
- Basic Steps: Identify the leak’s source, clear any debris from the area, apply roofing cement to the damaged section, and make necessary replacements. Always ensure the area is dry before proceeding with repairs.
Hiring a Professional Roofing Contractor
When DIY repairs are above your skill level or if the damage is extensive, hiring a professional is the best option. Here’s what to consider:
- Qualifications: Always check for licensing and insurance to protect yourself from liability.
- Experience: Look for contractors with experience in your specific roofing material. Ask for references from previous clients to gauge their work quality.
- Questions to Ask: Inquire about their repair process, warranty options, project timeline, and total costs. It’s also beneficial to understand any potential additional fees that could arise during the repair.
“Investing in professional roofing services can prevent further damage and costly repairs down the line.”
These methods and guidelines represent a comprehensive approach to addressing roof leaks effectively, whether you choose to tackle it yourself or seek professional help.
Home Roofing Maintenance and Security
Regular roofing maintenance is not just a chore; it’s an essential practice that safeguards your home from potential disasters. A well-maintained roof can significantly extend its lifespan, reduce the chance of leaks, and keep your living environment safe and secure. Ignoring roof upkeep can lead to larger issues that may threaten not only the structure of your home but also the well-being of its occupants.The condition of your roof plays a critical role in your home’s overall security and safety.
A compromised roof can lead to water damage, mold growth, and structural weaknesses, making the home vulnerable to intrusions and environmental hazards. Therefore, a proactive approach toward roofing maintenance is fundamental to ensuring the integrity of your home and protecting your family.
Routine Roof Inspection and Maintenance Checklist
To maintain the integrity of your roof, it’s essential to perform regular inspections and maintenance tasks. Below is a comprehensive checklist that helps ensure your roof remains in optimal condition:
- Visual Inspection: Check the roof surface for missing or damaged shingles, cracks, or other signs of wear and tear.
- Gutter Maintenance: Clean gutters and downspouts to prevent clogs, which can lead to water pooling and roof leaks.
- Flashing Inspection: Examine the flashing around chimneys, vents, and skylights for rust or damage, ensuring they create a watertight seal.
- Check for Moss and Algae: Look for growth of moss or algae, as they can trap moisture and deteriorate roofing materials.
- Inspect Attic Ventilation: Ensure proper ventilation in the attic to prevent heat buildup and moisture accumulation, which can compromise roof integrity.
- Evaluate Insulation: Inspect insulation for any signs of moisture or mildew, which may indicate a leak or inadequate ventilation.
- Professional Assessment: Schedule an annual inspection by a certified roofing professional to identify potential issues early on.
Regular maintenance not only prolongs the life of your roof but also enhances the overall security of your home. Keeping this checklist in mind will make a significant difference in ensuring that your roof remains a strong barrier against the elements and other threats.
Last Recap
In summary, being proactive about roof leak detection and repair is crucial for maintaining the integrity of your home. Regular inspections and understanding the repair process can save you time and money in the long run. By arming yourself with the right knowledge and tools, you can keep your roof in excellent shape and protect your home from the elements.
Remember, a well-maintained roof is not just an investment in your property but also in your peace of mind.
Q&A
How can I tell if I have a roof leak?
Look for water stains on ceilings, walls, and around vents, as well as missing or damaged shingles on the roof itself.
What are the common causes of roof leaks?
Common causes include aged roofing materials, improper installation, and damage from severe weather conditions or debris.
Is it safe to repair a roof myself?
While some repairs can be done safely by homeowners, it’s essential to assess your skill level and consider hiring a professional for complex issues.
How often should I inspect my roof?
It’s recommended to inspect your roof at least twice a year and after significant weather events for signs of wear and damage.
What tools will I need for DIY roof repairs?
Basic tools include a ladder, safety harness, roofing cement, a putty knife, and replacement shingles or flashing, depending on the repair needed.


